Running the Pipeline
This section explores details about running the pipeline such as the tools it uses, its requirements, and some suggestions on how to run it. Although some of these options are described in Command Line options, this will delve into more details.
Required Arguments
Python Modules on Case’s HPC
On an online server, users typically do not have permission to download softwares and modules directly due to lack of administrative privileges. In this case, users will need to set up python modules that contains the location of mitopipeline. Here’s an example of how to do this on Case Western’s HPC server that uses the slurm workload mananger and lmod. For more details, you can refer to the Case Western HPC website for more detailed instructions on how to use pip to install and use python modules:
First, to install the module, we need to first set up the enviromental module $PYTHONUSERBASE.
export PYTHONUSERBASE=$HOME/.usr/local/python/3.5.1
pip install --user mitopipeline
This will install mitopipline into the $PYTHONUSERBASE directory. To use the installed module (since this tool contains binaries), we need to include it in the path. For our local directory of packages, we will create a module file that will set those variables for us. We will call the module “python-modules” and we will set the version of the module to the version of Python we are using. First, we will create the directory (just once).
PYTHONMODULES=$HOME/.usr/local/share/modulefiles/python-modules
mkdir -p $PYTHONMODULES
cd $PYTHONMODULES
Then, we will create a file called 3.5.1-gcc.lua in this directory that contains the following contet:
-- This is Lua module file for our local Python
-- modules.
-- To use it just run
--    module load python-modules/3.5.1-gcc
--
--

load("intel/17", "openmpi/2.0.1","python/3.5.1")

pushenv("PYTHONUSERBASE",pathJoin(os.getenv("HOME"),".usr/local/python/3.5.1"))
prepend_path("PATH",pathJoin(os.getenv("HOME"),".usr/local/python/3.5.1/bin))
To use this module, just run
From here, if you used mitopipeline’s “-d” command line option to download tools for you, the tools directory can now be referenced through: ” /home/<case_ID>/.usr/local/python/3.5.1/lib/python3.5/site-packages/mitopipeline/tools/”. Note: If you are using ANNOVAR, you must move the entire folder over to “~/.local/lib/python3.5/site-packages/mitopipeline” after downloading yourself, because ANNOVAR requires user registration before downloading (so it’s unavailable through “-d”). Of course, you can also specify your own tools directory.
Luigi
As mentioned before, the dependency management of the pipeline is handled through a python package called luigi. However, currently the only options available when running luigi are adjusting the number of workers. You can read more about workers here
Luigi handles dependency management through class objects called Targets and Tasks. Targets are a Task’s output. A Task is run after a required Task is complete and also outputs a Target for a next Task to be run. For example, the workflow for two tasks running on a database can be shown like this:
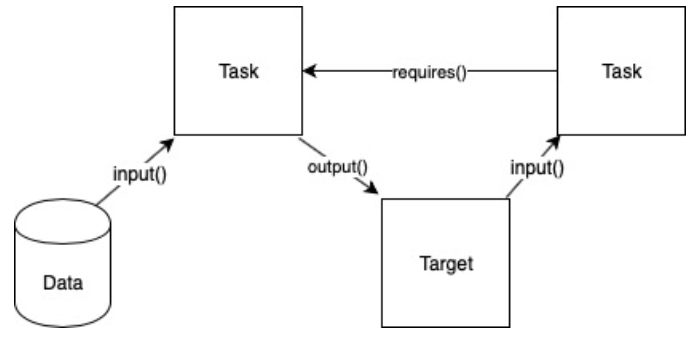
In this diagram, the first task takes in the data from the database as input and outputs a target. The target is then input to the next task to be run. In order for the second task to be run, it “requires” the first task to be finished first. This is tracked through the existence of the first task’s output (the target). Once it sees the target in the output, the 2nd task will begin running. The advantage of such a design is its asynchronous processes. Since the time for each individual file may be different for the same task, having a worker that looks solely for the output target allows for the multiple tasks to be run at the same time.
Softwares
As described in the pipeine steps section, all of the steps have some software requirements in order to be run. There are two options for getting the softwares necessary.
The first choice is to use the command line option -d. For example, the command
$ mitopipeline -d -r annovar snpeff
will download all the necessary software into mitopipeline’s tool’s directory for all steps except for annovar and snpeff. You can then use the mitopipeline normally without specifying the tools directory.
The second choice is to specify a directory that has all the necessary softwares downloaded. This is only necessary only for the step softwares, including seqtk, GATK, SNPEFF, and ANNOVAR. Keep in mind that mitopipeline will check for the naming convention of the software’s folder that contains its executable as the same name as the step i.e. ‘gatk’ step will look for a folder called ‘gatk’ within the specified directory for its executable.
A number of softwares are necessary to be run on the command line as they are called directly through the bash scripts. In particular, ‘samtools’ and ‘bwa’ need to be able to be executed through the comand line. On MacOSX/Linux, this can be achieved by either copying the executable to your /usr/local/bin folder or adding the folder of your executable to your $PATH variable. You can read more about each step’s required softwares on the Pipeline Steps page.
Using Slurm Jobs
Some servers have the slurm workload manager set up on their system. If you are using such a server, an available option is to use the option -l. This will submit slurm jobs for each step of the pipeline for each file and save the files in a folder within the specified -out directory.
Tmux
Currently, luigi’s scheduler is not implemented within this tool and only uses its local scheduler (read in luigi’s docs). Thus, it requires that whatever process that is running mitopipeline to be continually running. One way to do this is to run it on a server using a tmux session. You can read more about tmux here.
Once tmux is downloaded, you can start a new tmux session by typing tmux into your command line. Then, after beginning the pipeline through the mitopipeline command, you can exit the session by pressing ctrl+b and then d. This will detach the current tmux session from your terminal.
In order to reenter your tmux session, you can type in tmux ls in order to list all of your sessions and then tmux a -t <your-session-id> to re-enter that tmux session where your mitopipeline is running.